A few blogs ago I spoke of scanning film on a budget using my trusty Ion Slides2PC 5mp 35mm scanner. In that blog I also mentioned I can scan film with my DSLR using my 50mm f/1.8 and an extension tube. Whilst I can use this method I was never really satisfied with it. if I wanted to change from 35mm to medium format or vice versa I had to change to a different extension tube and adjust my tripod. I recently made a purchase that has taken that hassle away from my DSLR scanning workflow. I bought a Macro Converter.
"What the heck is a Macro Converter?" I hear you ask. It is an optical device that converts a 50mm prime into a macro lens, thus allowing me to take better quality images of my negatives without the hassle of swapping between different extension tubes. I found a Panagor branded one on ebay and decided to give it a try.
Panagor was a brand used in the UK, Europe and Asia by Jaca Corporation, a Japanese distributor of photographic gear that operated along the same lines as Vivitar. They bought photographic gear already in production at various Japanese companies and got their brand printed on it. The Panagor Macro Converter was one such item.
I had been looking for a Nikon F mount macro lens for a while and they were always just out of my financial reach. I saw this macro converter and noticed it was an M42 mount. I have a couple of M42 to Nikon F adapters and I also have a Pentacon 50mm f/1.8 M42 mount prime. I figured it was worth a try and hit the buy button.
When it arrived I knew I had bought an excellent item as it looked virtually unused. The macro converter was originally sold in the 70's and 80's during the hey day of film and I decided to fit it to my Nikon D700 full frame to take advantage of its 1:1 macro. It is also adjustable to 1:10 and with the focus of the 50mm lens I had a lot to play with. My Pixl-Latr and A5 led light pad held and illuminated my negs and I fitted my D700 to my Tripod with an arca swiss style L bracket.
It didn't take long to get the hang of using the macro converter, I just kept making small adjustments until I had the focus and frame size as good as my eyes allowed using the live view function on my Nikon D700. Patience is the key and once the first frame is right, the rest follow on pretty quickly. I edited my images using Affinity Photo.
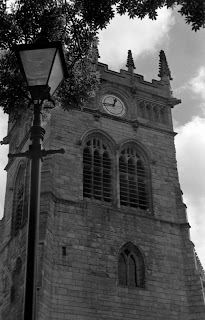
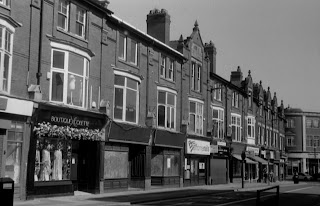
Here's a few of my DSLR scans of various B&W films I have shot this year. The level of detail retained with a DSLR is far better than the cheap dedicated scanner and with practice I know I can produce images that I can enlarge to A4 and above with little to no problem. I have put the DSLR Scans in an album on Flickr that you can visit using the link below.
DSLR Scanning Test


.jpg)


No comments:
Post a Comment